
It’s coming up on gift-giving season (lalala let’s pretend there’s more time, lalala), and little gifts for knitters are always a good thing to mention out loud to your gift-giving inclined friends, or to know about to give to other knitters in your circle. Even if it weren’t that time of year, though, there are always certain little knitting notions that I can’t ever seem to get enough of. I know I own approximately 37 retractable measuring tapes, but they disappear into project bags and handbags and, you know, the ether, and I will never turn down a new one.
The same goes for stitch markers. There are so, so many kinds of stitch markers out there, and they are so cheap, and so freaking tiny that they disappear on their own without even trying. I recently tossed a purse trying to find a USB drive and 3 stitch markers fell out that I hadn’t realized I’d been hoarding – I probably needed them really badly that one time on that train that day, why couldn’t I have discovered them then?
Anyway, the point is, stitch markers are awesome. Here are at least 9 things you can do with them.
1. Marking the beginning of a round
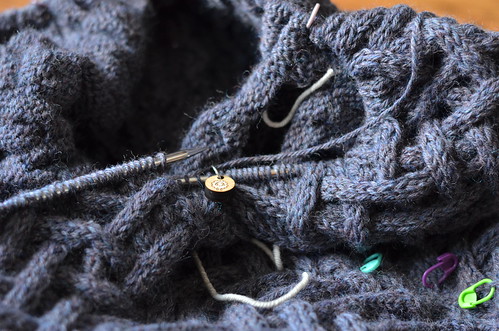
This is probably the first thing we learn as knitters when working a project in the round – or at least second, right after “join, being careful not to twist.” And let’s face it, that’s an instruction we’re all pretty familiar with too. You need something that is going to make it very, very obvious that you are transitioning back to the beginning of the round, especially if you’re working with a charted pattern or have to count rounds. This is where I like to use a fun-looking stitch marker with a little dangly decoration or bead, because let’s face it, on some projects getting through an entire round is a mini celebration all by itself.
(Above: my in-progress Joist pullover in Cascade 220 Heathers from last winter)
2. Right Side vs. Wrong Side
Another one of the most useful steps for newer knitters working ‘flat’ items (as opposed to ‘in the round’) is to keep good track of your Right Side (the side you want the world to see) vs. Wrong Side (the side you probably never want anybody to see ever). Just stick an openable stitch marker in a bright colour (or a safety pin) on the Right Side of the work and then you’ll always know where you’re at in tracking your stitch pattern.
3. Marking horizontal stitch repeats
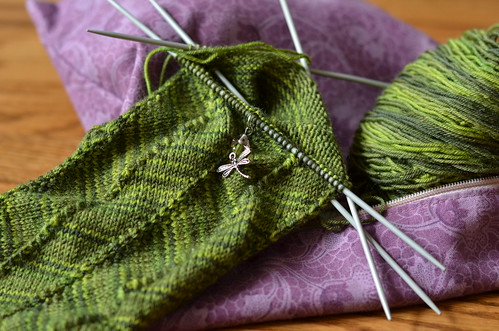
If you’re working not only in the round but with a stitch pattern that is repeated a number of times around the circumference of the project, you may find yourself in need of some markers to step in between each stitch pattern repeat. This helps you keep track of what you’re doing and will help you to notice sooner if you’ve done something wrong. For example, if each stitch repeat ends up with a “knit 3 sts” instruction and you get to the stitch marker and have only knitted 2 sts and not 3, that means you’ve got to stop and figure out where you lost a stitch.
(Above: a pair of Jaywalkers socks in Lorna’s Laces Shepherd Sock on my needles this past summer. Cute dangly stitch marker divides between the 2 stitch repeats across the foot of the sock).
4. Marking vertical stitch repeats
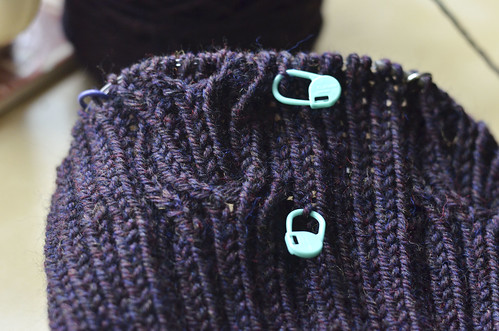
Related, but less often used, is the technique of placing an openable, ‘locking’ stitch marker at the beginning of a chart repeat to make it easier to count the number of vertical rows or rounds before needing to start the next repeat. This is especially useful on projects with large cables, which make it harder to count rows. If you place a stitch marker on a stretch of plain knitting near the cable, counting rows becomes a million times easier.
The openable, locking kind of stitch marker is extremely versatile, and can be used in almost any stitch marker situation. (I can’t think of one it won’t work in, but that doesn’t mean that situation isn’t out there). Clover, Knitter’s Pride, and KnitPicks all make them, and lots of other folks probably do too. I will keep buying them from pretty much anyone who makes them.
(Above: a current hat in progress in Cascade 220 that is about to get ripped out and re-knit with a different stitch combo.)

5. Holding onto a dropped stitch
I’ve been knitting pretty obsessively for 10 years and I still drop stitches all the time. Most of the time I manage to catch them quickly and scoop them up and keep on knitting, but if you’ve dropped one several rows back and don’t notice until much later, you need to do some triage. Hold it safely on a lockable stitch marker and then go back and deal with it later.
This is exactly what I did with my Uji cardigan, pictured above, and I blogged all about it at the time.
6. Seaming garments
One of the final step of working up a sweater that has been worked flat in pieces, is to sew it together along a number of different seams. It’s important to make the side seams in particular match up, especially if you’ve done waist shaping decreases and increases that would, ideally, end up being placed symmetrically on either side of the seam.
To prepare this in advance, use your locking stitch markers (or safety pins), to match together the pieces that you’re about to seam, making sure they line up properly before you sew – and possibly un-sew – the final garment. Just remove the markers as you work the seam.
7. Marking button-hole placement
Again in the sweater-finishing department, if you’ve got a cardigan that needs button-holes worked up along the band or collar, it’s a much easier process if you can set it up in advance. Use your openable stitch markers (or safety pins) to mark the placement of your buttons, ensuring that they are evenly spaced out along the length of the cardigan front. Then go ahead and pick up stitches for the button-band (or however the band is worked). Once you’ve got it all crumpled up working the button-band, it’s much harder to tell how evenly spaced the button-holes will be.
(Above, my original Chatelaine cardigan in Madelinetosh DK, getting its final touches a couple of years ago).
8. Marking increases and decreases
In a similar vein to marking your stitch pattern repeats, it’s often easier to keep track of your increases and decreases by marking them out – or marking every 2nd one – with a stitch marker. Especially if you’ve got a complex project with cables or textured patterns that might hide the increases, or if you’re working with a dark colour that’s harder to see them on.
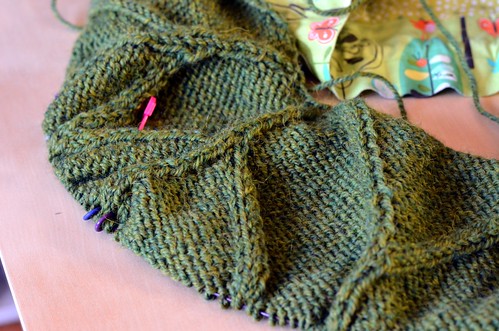
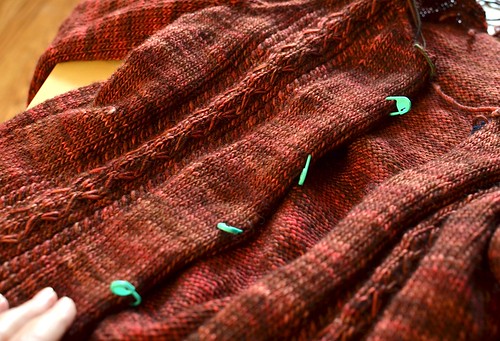
9. Tracking different parts of your garment
If you’re knitting a sweater from the top down, you’ll have several inches of knitting before the clear sweater-ish shape starts to emerge. At a glance, it’s hard to tell where your sleeves are starting versus the body (or back and fronts, if it’s a cardigan). The pattern will probably tell you to place markers on the needles to mark this (like in the photo above, where you can see the little purple rings along the needles), and it’s a lifesaver.
I like going the extra mile and busting out the super bright coloured markers, for their very existence has been building up to occasions just such as these. Why not throw a bright pink one on the sleeves sections, or bright green on the back, for example. If there is the added step of working different stitch pattern setups on each section, there’s every reason to ramp up the stitch marker attention.
(Above, my Lempicka cardigan still in progress, from last winter, in Berroco Ultra Alpaca)
All in all, stitch markers are great. I hope you’ve got lots. What stitch markers are you using right now?
Happy knitting this fine Tuesday!
*
*
*


I especially enjoy using mine for #4. It is so stinking hard to count rows in cabled fabric, I don’t think I could do it with any confidence without a marker.
I’m cheap. I keep a piece of plastic drinking straw and a pair of scissors in my knitting bag, and cut off stitch markers as I need them!
I am very picky about stitch markers. Like you, I like the lockable ones and love bright and dangly, but I cant bear anything which might catch on my knitting. So, I dont get many beaded ones as they tend to be made with sharp pins that get caught. Does that make me a stitch marker kill joy?
I’m also cheap, but I keep the yarn ends in a small plastic baggie in my purse. I found that the straw isn’t big enough for some needles and too big for others, so by keeping the yarn used to keep skeins together and the ends of my projects, I have the perfect size for any needle I need. And I’m not wasting the little bits too small for stitch holding!
I will add another use for sweaters that are pieced! I put a lockable stitch marker to tell the front of an item on those pieces like in #2, but also add another stitch marker on whichever leg of the marker as it hangs. It helps me remember which side of the sweater front or which sleeve it is at a glance if I need to put the project on hold for a while since I don’t always follow the exact order of every pattern piece….
My other use for stitch markers is to help me keep track of total rows worked in a garment piece. It is a lot easier to seam a front and back that have the same row count than it is if they vary a bit. It’s also easier to have your two sleeves be the same length on a permanent basis if they have the same row count. Set-in sleeves look neater if you can easily sew half the sleeve cap stitches to the front and half to the back.
To mark slipped stitches as I am turning the heal. Easier to find and pick up later.
I keep spare coilless bulb styled safety pins pinned to my bra straps for emergency situations because they are the number one important knitting tool.
Such a good and sensible post. I do use stitch markers sometimes. But more often than not I wing it. Which is a bit slapdash (let’s be honest!)…
I’m about to start the button-holes on a cardigan, so # 7 comes in really handy. I was using round headed pins… This is a lot more practical not to mention less ‘prickly’ 🙂
Love your blog by the way. One of my favourite knitting blogs.
Oh you are so right! I love my stitch markers, so much in fact that I wrote a review on a few kinds.. Do you mind if I link to your post in it?
I’ve been knitting 30 years are have used all but #6. Only because I use those old pink hair pins ladies used to use with curlers as pins before seaming. Or maybe they still use them, I don’t know. haha Great post…fun to see!
Sleeve increases: Count out how many increases, count that many safety pins and chain them together and put on the needle. Then, every nth row or inches (whatever the pattern says), do the increase, put in a pin and continue. Once you’re out of pins, you’re done! Saves having to keep checking the pattern and counting. This also works for cardigan fronts – do the first one and pin every 10 rows. When doing the second, unpin as you go and repin in the working front. No pins left – you’re done (plus the extra few rows that didn’t get to a whole 10)
I use the uncoiled safety pins.
I’ve never thought of #8 before, and I have trouble with that all the time! Thanks for the tip 🙂
The cable one…#4
I use the cheap plastic ones like you show here. I have a hard time remembering if I’m on an increase/decrease row, or a “do nothing special” row when doing sock toes and heels. So just after the first stitch in the row I have two stitch markers that are hooked together, one in “as red a color as I can get” and one in “as green a color I can get” – red for “no/stop” and green for “yes/go”. Only one of the two markers is on the needle, the other dangling from the first marker. When I get to the stitch marker I flip which marker is hooked on the needle and which is dangling, then repeat my little mantra: “Do the dangle”…if the dangling marker is red/no/stop, I don’t do whatever increases/decreases are required for that round, if it’s green/yes/go, I do the increases/decreases.
Sounds more complicated than it is in person, and when recently doing a baby dress with increases spaced at various points around the dress, but only on every 7th row, it came in SUPER handy….especially with every day interruptions distracting me.
i use the clover safety pin type constantly on everything i make. and i’ve used them in every one of the suggestions you’ve mentioned!!! great minds think alike!!! esp marking right side of flat knitting!!!
I use the clip on type when I am casting on stitches, especially when the pattern calls for 100 plus, use them every 10 or 20 counts, makes it much easier to know where you are count wise. There are times when I have to “drop” and run to help my Mom (87 and bedridden), the stitch markers make it so much easier to pick up where I left off.
Love your blog one of my faves!
Another use for locking stitch markers: I use them in place of cable needles when working cables on small items such as socks.
That’s a really good idea – must remember it! I lose stitch markers all the time and it would be much less annoying if they were only bits of cut straw…
Marianne – you’re absolutely right about that tip, using stitch markers to count out your long cast on number in small increments! Can’t believe I forgot that one 😉
Happy knitting! Glenna
On Wed, Nov 26, 2014 at 11:56 AM, Knitting to Stay Sane wrote:
>
Thank you for havingsuch a great blog! I love all of your stitch marker uses. I wanted too share another one. I knit my socks 2 at a time using magic loop. It is not always easy to convert a standard pattern to 2 at a time and sometimes I have stitches that need to be moved from one needle to the other. If that stitch is the first one on the 2nd sock or the last one on the 1st sock on the needle, I take it off, put it on a locking marker to hold it and then pick it up again when I get to the other needle. I hope that makes since!
A important use for the safety pin style which you have neglected is as a stitch holder for small numbers of stitches, such as a mitten thumb opening, the front neckline when you don’t want to bind off stair step style, for holding the button band stitches etc. However for “pinning” the pieces together before sewing up the seams, absolutely nothing works better than old fashioned bobby-pins. They never fall out and hold firmly enough that you can actually try things on, carefully. Plus they cost almost nothing, so you can lose them to you hearts content.
Thanks so much for this. As a newish knitter and a new cabling addict, I love that I can use stitch markers to help me keep track of my rows in those projects. 😀
I am a bit OCD about stitch markers. I even color code them.
I’m working on the Gwendolyn sweater right now, which says things like, ‘do chart A # times then chart B then…’ So I highlight my charts and use the corresponding stitch marker color to mark the start of that chart on the RS. It’s lovely because I don’t have to chart out the *whole* row in order, just have each chart once and color coded.
I prefer little binder clips to put parts together for seaming. They hold more firmly.
As a former horse show competitor, I have tons of rubberbands meant for the horse’s mane. I use these as disposable and some of the brighter small hairties for little girls to keep. They are both incredible useful.