
Inevitably, when I teach a knitting class, a few miscellaneous things crop up that fit into that category of Things Everyone Does But They Are Not Shiny Enough To Normally Get Huge Technical Explanations About them All The Time category. Those things that, once you know how to do them, you often take them for granted as a normal step. Sort of like how, once a person explained to you that “stockinette stitch” is actually code for “knit all stitches on the Right Side of the work and purl all stitches on the Wrong Side of the work, when working flat, or if you’re working in the round then that means that you knit all stitches on every round,” you stopped asking what stockinette was and now you just do that without having to need it explained to you.
Picking up stitches along an edge is something that fits into this category. So, I thought I’d take the liberty of making a photo post about that, in the event that there are some of you out there who are figuring this out. Most often you’ll encounter this task in one of two place: picking up stitches for a neckline/collar/buttonband for a sweater, or along the edge of a heel flap of a sock in order to create the gussets (when working from the cuff-down). Here I’m going to show you how I pick up stitches in both such situations, using my Dusseldorf Aran (pink Berocco Ultra Alpaca) for the neckline example, and the heel of my sock design for Tanis Fiber Arts’ Year in Colour yarn club March installment (more posting about that to come, from both Tanis and myself, I am sure!), in her club colour for March.
Much of the process is the same, in either case, but there are a few small differences. Let’s take a look at it step by step.

For a neckline or buttonband or collar, you generally have to pick up stitches along a vertical section of the body (or cardigan fronts, as the case may be), and for the collar or lower part of the neck you also often have stitches held aside on waste yarn as the central section; These last few are just slipped back onto the needle and knitted as required, but it’s the picking up along the vertical edge that is the required step here.

The way I do this is to simply insert the needle through the middle of the stitch (above), and then pick up the yarn with the tip of the needle (below).

This is, as you can see, taking advantage of the continental-style method of knitting, wherein the yarn is held in your left hand, and stitches are ‘picked’, as opposed to in the English-style or right-handed method which involves ‘throwing’ the stitches. I am generally a right-handed knitter, but I am also generally of the opinion that everyone should know how to do both (even if they only mostly use the one method), because you just never know when the other method is going to come in hand. Picking up stitches and working stranded colour-work are the two times I’m glad I know how to knit continental.

If you’re picking up stitches along a vertical edge like this, you also generally don’t want to pick up a stitch in every single stitch on that edge. This is because you are working a new stitch into what was formerly the end of your row on the vertical-running piece, and your picked-up edge is going to be going horizontally. Since (most of the time), your row gauge is usually looser than your stitch gauge (check it, I’ll wait), if you were to pick up a new stitch in every row, you would end up with one floppy collar. The way around this is to pick up stitches in the same general ratio as the row-gauge-to-stitch gauge ratio. This generally works out to picking up about 3 sts for every 4 along the edge, and that’s the ratio I use. It was good enough for Elizabeth Zimmerman and gall dangit it’s good enough for me.

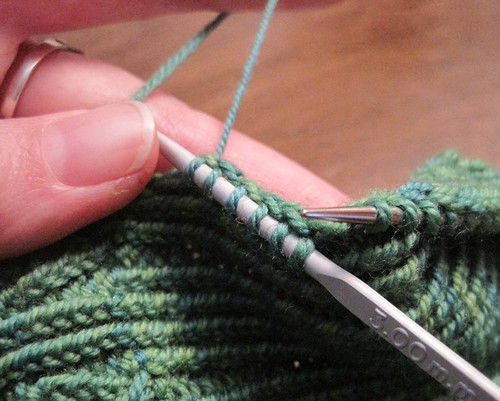
Another option, which I’ll demonstrate below also, is to pick up the stitches using a crochet hook, then slip them onto the needle afterwards. This is a comfortable alternative if you’re not into picking stitches continental-wise.
This next set of photos details the picking-up process on the heel flap of a sock. I like heel flap construction, and it works well for me since I tend to work socks from the cuff-down. So, this involves working a heel flap and then picking up stitches on the edge of the heel flap to make the gussets and re-start the round for the foot. For a heel flap, the main difference in this process is that you are working with a specific sort of edge construction. If you’ve done a traditional heel flap where the first stitch of each row is slipped, as you are working the flap, then you will end up with an edge that has a nice little row of elongated slipped stitches waiting and ready for you.

So, we have the same steps as above, this time inserting the needle through the base of the slipped stitches on the heel flap – but not the actual slipped stitches themselves. (It took me a couple of years of sock knitting to learn that part).

Then, you pick the yarn from your left hand (below)…

…and slip the new stitch through.

And that’s that. Keep doing it for every slipped stitch, and maybe one or two extra at the join of the instep, if you’re worried about gappy holes. As I mentioned above, though, one alternative to working these picked-up stitches with the yarn held continental, is to use a crochet hook. (You could do this for a neckline/buttonband pickup as well).

Insert the crochet hook through the edge in the same way as above…

…and then pull the new stitch through. Eventually, this will leave you with several stitches collecting on your crochet hook. Just transfer them every so often to your working needle.
In both cases – picking up at a neckline or on a sock edge – this process is likely to leave that first picked up row with relatively loose stitches, like you can see below.

So, what you do to fix this is to work these stitches through the back loop on the next round – in other words, as ktbl, or twisted knit stitches. This tightens the gap left by those loose stitches on the pick up round. Here we can see the step of inserting the needle through the back of the knit stitch on the needle:

And then wrapping the stitch as normal:

And then your first row becomes a nice neat little strip of twisted stitches. From then on you can work the stitches as normal knits, when you encounter them, or however the pattern tells you to.

So there you have it folks, just another piece of my knitting brain from me to you.
I hope you have an excellent Saturday!


I haven’t actually even attempted continental-style yet, but I am a big fan of the crochet hook for picking up stitches. So much easier. One thing I discovered, though, is that, the way I do it anyway, the stitches I collect on the hook aren’t facing the right way, so I have to switch them as I move them onto my needle. Just an element to consider when using that method.
I’ll have to try that twisted stitch method for the first picked up row, though. Thanks for that!
Thank you so much for this post. I only learned how to knit a little over a year ago and I have been trying to knit socks now for six months and while I have gotten quite good at every other part of sock making, picking up the stitches at the heel has been my downfall. I always end up having super loose stitches there with holes basically. Nothing I had read said that you actually pull a new stitch through.
Excuse me, I’m now going to go rip out the almost finished sock that I have and do the heel correctly. I’ll forever be in your debt for finally explaining what I’ve been doing wrong.
The funny thing is that I am a continental knitter normally, but I find it so much easier to pick up stitches when I hold my yarn English style. Something about the angle. Weird!
Very nice tutorial! I knit my first pair of socks well over a decade ago and it’s never occurred to me to twist the first row of stitches to tighten them up! What a great idea.
But I don’t understand your comment about the base of the slipped stitches. It looks like you’re putting your needle through the stitches themselves. What am I missing?
Omgosh, what perfect timing. Am just learning socks and picking up stitches is one of my struggles. THANK YOU!! I love your blog. Knitting is THE ONLY thing keeping me sane right now…your blog name cracked me up.
I pick up stitches all the time and never think twice about it, but then I was reading this post and “OMG you can use a crochet hook??!” I totally have to try that next time, it looks so wonderfully simple! Thanks Glenna!
Glenna I LOVE it when you do tutorials!! Your instructions and photos are always so clear (must be the prof in you 😉 ) When I started my first socks a few years ago picking up those slipped stitches wasn’t intuitive for me at all – and thanks for the tip of Ktbl!!
This could not have come at a better time! I am working my first ever pair of socks and the heel has been scaring the stuffing out of me – mainly because I have yet to actually pick up stitches and work them. Your tutorial here is fabulous!
The photos and dialog make the entire process seem less daunting. I’m going to go and finish my ribbing so I can get to the heel and incorporate what I’ve just learned.
Thank you so so so so much!!
I may have to do another post in my blog about how much I love you. (grin) I am knitting my first sock and my first I love you blog was about how you posted your video on cabling without a needle which I needed to knit the leg of the sock. I finished the leg last week and am going to start the heel and this was my next big quandry to tackle – and again – you heard my silent pleas for universal guidance and gave me this post. Thank you. I really do love you. (and since the socks are for my husband he loves you too!)
Thanks for this! I guess I’ve been picking up stitches the wrong way for socks all this time — eager to try it the way you show to see if I will get a less holey gusset start.
Awesome – thank you!
I’ve always wondered what part of the stitch to pick up but have never bothered to look it up, so thank you for showing what to do different with an edge and a heel edge. I pick up my stitches the way that you do but I throw and have never had any difficulty wth it.
Thanks Glenna! That was really helpful! I’ve abandoned a couple projects mid-way because I couldn’t find a helpful tutorial on how to pick up stitches. I’ll go back and finish those soon!
Love your pictures; they’re so clear, as well as your explanations.
I use a gusset heel on toe-up socks, too; you can go either way. It still makes a right angle turn.
And I pick up the stitches for my gussets through just one of those loops, the outermost one, and pick up through the back loop. I end up with a twist like you do, but I do it first. I like your way of knitting through the back loop later, better. A better way to get the same result!
Thanks for sharing.
Your demos and tutorials are always so clear! Great photos too. Teaching is definitely your calling. Enjoy your next trip into Toronto!
Great tutorial! Thanks for posting this. I didn’t know about the trick of ktbl to tighten up the picked-up stitches – that is really good to know!
Extraordinarily helpful to me! Been knitting for 40 years, but I have tended to avoid anything that gives me trouble. Have just started to knit socks. and now I can get rid of that “eyelet” look along the heel flap. Really, really good tutorial. Thank you!
thanks for the demonstrations I will now use differing techniques when picking up stitches
Thank you! I knew that I’d been doing something wrong but hadn’t been sure how to do it right. Clearly now I need to start a project that includes picking up stitches 🙂
Re: Base of the slipped stitches, not through the middle of the stitch. I did not know that! Now I do! Thanks!
I ended up with a small hole on my pullover neck. I’m going to try the crochet hook method on my next pullover. Maybe that will work better for me. It sounds like I’ll have more control that way.
Hmmmm. I usually pick up through the base of the stitches for collars and bands, but through the stitch itself for sock heels — just the opposite of what you’re showing.
It seems that through-the-stitch for collars and bands creates distorted stitches and through-the-base for socks creates a ridge inside the heel.
Color me confused.
If you’ve got a different way of doing it, that works well for you, by all means keep doing it! I am always happy to show how I do various techniques if it is helpful for some, but there is never only one way of doing something in knitting.
Happy knitting, G
Your knitting blog has become one of my favourite sites as I am new to the blogger experience so am finding some of your past archive items equally as interesting. I am recently returned to my true passion after 15 years due to my recent early retirement and also to assist me in my quest for health and wellness. I find knitting so relaxing and satisfying I incorporate it into my day. I can’t believe how much I missed the feel of the yarn and the steady rhythm and bliss in creating something special with my own two hands. I find that there is so much to learn and so many new techniques. Your blog is just excellent and I commend you on remembering those of us who need a refresher or a new way to try an established technique and make it even better. It is so timely for me to have found your blog at this time. Kudo’s – I also have plans to try your “Ivy” at some point in the next year.
My admiration …. your sharing is truly a gift …
So helpful, wish I had this when I first learned to pick up stitches! Will recommend 🙂
I think you’ve cleared up the “picking up stitches” problem for me (especially on sox). Thany you very much. JL
Excellent. Thanks for the post. This beats the heck out of how I was trying to do it. It will be the way to go for my next project when I have to pick up stitches.
Now I know how to pick up the stitches on a heel flap… started on socks on four dpns, one sock at a time, but working them simultaneously…. then taught myself knitting a sock on two circulars… then knitting two socks on two circulars. I am back to knitting on four dpns. Will look for a good tutorial because it was a mess… the yarn got all tangled up, the cord on the circular was doing its thing, would not stay put….
I am down to the toe decreases, doing fine… have learned along the way. Plan on trying the magic loop next time. Perhaps that is the way to go in knitting two socks at the same time and finishing them at the same time.
Thank you… I love your blog, your instructions are so clear.
May in Atlanta
I came back to this tutorial last night to see if it could teach me some new tricks. Going under the slipped stitch was great for my Herringbone Socks. I’ll do that again! Thanks!
Just what I needed and really clear, THANK YOU!
Came to this post late because it’s something I was pretty sure I didn’t do correctly, and holy epiphany! Under BOTH legs of the slipped stitches on socks? I was trying to ktbl of the wicked long loop of one leg of that stitch and getting big loosey-goosey X’s along that line. I’ll have to go try that right now! Thanks kindly!
Wow- thanks for this tutorial, I was searching for something to explain how to pick up stitches on a heel flap! and lo and behold, I get it now. Thank you.